From Zero to Hero: Phishing Campaign. Part 2

Chapter 2: Technical Implementation
Architecture
The phishing campaign scheme I'm considering is an example of a MitM attack to capture access credentials and sessions of attacked employees, including two-factor authorization (2FA) confirmation via TOTP codes and push notifications.
Infrastructure components:
- Phishing server. Any VPS server with Linux will do as a phishing server. For example, AWS EC2, especially at the moment EC2 instance for one year, can be obtained for free;
- Service for managing phishing campaigns GoPhish* by Jordan Wright;
- Reverse-proxy server for intercepting requests Evilginx 3* by Kuba Gretzky;
- An email server or service for mail distribution via the SMTP protocol. Configure SPF, DCIM, and MX domain records for this mail service. At the moment, you can use ZOHO Mail service with distribution of up to 150 emails per day for free;
- Cloudflare Turnstile is not a required component but is great for protecting a phishing page from being scanned by automated bots and detected by anti-phishing solutions. The service is free to use.
* Evilginx and GoPhish can be used as independent services, but it is more convenient to use a solution called evilgophish by Dylan Evans. This project includes modified versions of Evilginx and GoPhish to support working with one database, as well as additional features, such as modules for SMS distribution and QR code generation, evilfeed service for receiving notifications, and many other changes, which I recommend reading about on the project page.
Steps
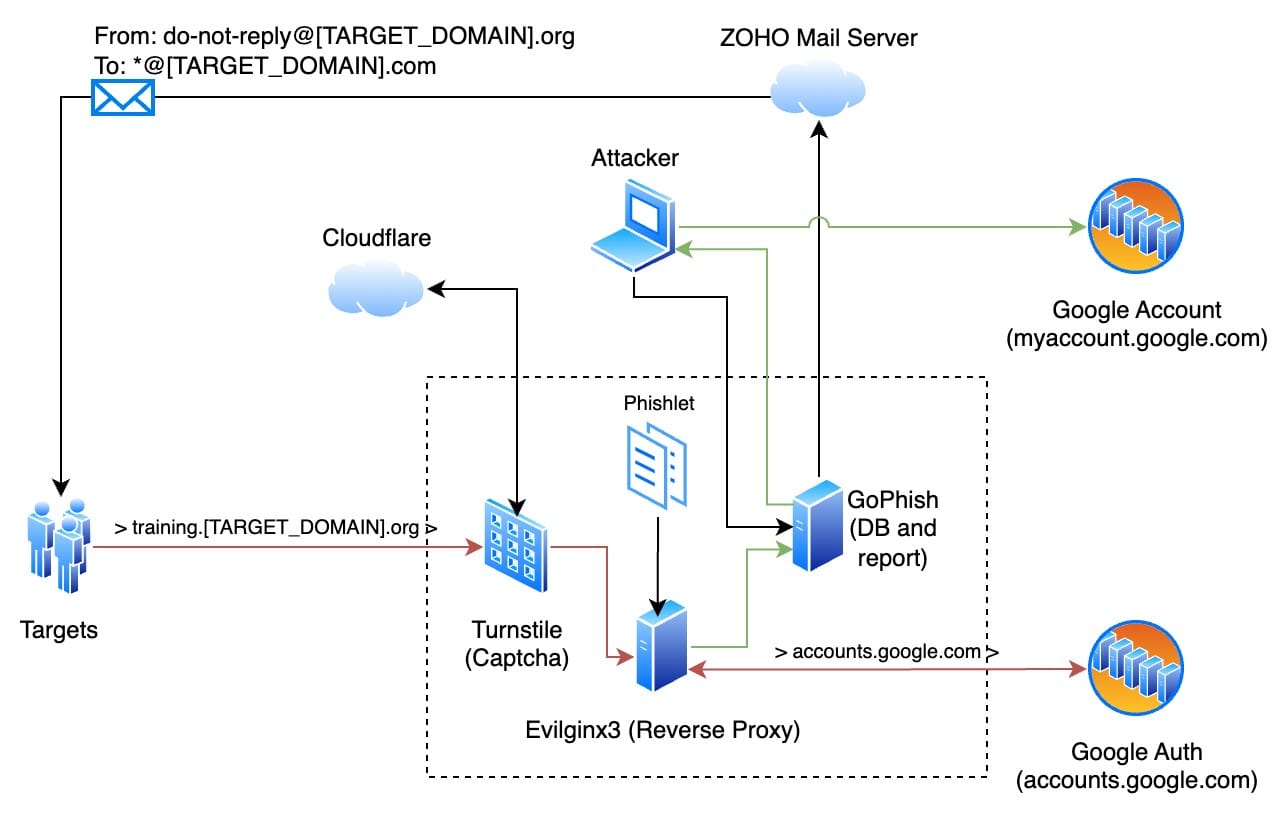
An example of implementing an architecture for a phishing attack:

The numbers in the diagram correspond to all the steps involved in phishing users:
- Operator/Auditor sets up and runs a phishing campaign in the GoPhish service;
- GoPhish uses the SMTP protocol to send emails through a mail service;
- The mail service sends mail to the employee mailing list;
- Employees being tested receive emails and click on the link;
- Cloudflare Turnstile verifies by internal algorithm that the users who opened the phishing site are not bots/scrapers and decide to access the phishing page;
- The Evilginx reverse proxy server receives the request, checks the URL against the phishing campaign data, and identifies the user from the mailing list (user identification is only possible if individual campaigns are launched for each unique recipient on the GoPhish side of the original mailing list, more on this in the next chapter);
- A phishlet is a special YAML file that describes the rules of domain rewriting and request handling for each service within phishing campaigns. Evilginx uses data from the phishlet to substitute values in requests and capture access credentials (logins, passwords, TOTP, session/cookies);
- Employee authorization requests are passed to a target site, such as an authorization portal. Since this is a MitM attack, the response from the authorization service is sent back to the Evilginx proxy server;
- Evilginx extracts access credentials from user requests and session/cookies from the response and provides access to them to the operator. Information about successful data capture is transmitted to the GoPhish service for fixing in the database and accounting in statistics;
- The operator receives notifications and statistics about the status of the phishing campaign and can retrieve the access credentials and captured sessions of the attacked employees;
- The operator uses the intercepted credentials on the authorization service via login to confirm validity and successful phishing. This step is not mandatory and should be carried out after agreement with the customer to exclude unauthorized access to confidential information.
Chapter 3: Example of a phishing campaign
Scenario
As I wrote earlier, the task was to conduct a phishing campaign on the list of mail addresses of 42 employees of the development and administration departments agreed with the customer.
Company website: www.[TARGET_DOMAIN].com
Mail domain: [TARGET_DOMAIN].com
It was agreed that the text from a typical mailing from the KnowBe4 training service should be used as the phishing text. Employees of the organization systematically receive messages from this service as part of anti-phishing training. The text of this message is monotonous, and the message about the need to take the training makes them want to either postpone it or do it quickly and not remember about it. Such a mailing is an excellent candidate for a phishing campaign. Typical text of a mailing:
Template for GoPhish:
For more information on template preparation and variable application, see the documentation: https://docs.getgophish.com/user-guide/template-reference.
As a domain for sending emails and setting up a phishing server, a domain similar to the target company's website but with a different TLD was available for rent: [TARGET_DOMAIN].org.
Employees of the target organization use Google accounts with 2FA to authenticate to services via SSO. It was decided to proxy through Evilginx accesses to accounts.google.com to intercept the user session after successful authorization. Schematic of the targeted phishing attack:
Phishlet
Currently, the evilginx3 and evilgophish projects do not have phishlets ready for Google Auth, so you need to write them yourself. Documentation on preparing phishlets is available here: https://help.evilginx.com/docs/phishlet-format.
An example of my phishlet for capturing Google authorization sessions is in Appendix 1. The peculiarity of my implementation is hiding the keypass authorization buttons, redirecting from keypass authorization to alternative login methods, and replacing the stub in case of the password change request.
In addition, the automatic substitution of the target’s email address into the authorization field via JS injection was implemented. As a result, the employee does not need to enter a login, which increases trust in the phishing authorization page.
Modification GoPhish
To implement unique links for each user, we had to implement a kludge because GoPhish does not support passing unique parameters through links, and thus, to implement a targeted phishing campaign for each unique email address, we had to create a unique campaign with a unique link with parameters on the GoPhish side.
Two scripts were written to avoid entering all parameters manually via the web interface:
- gophish_create_groups.py (Appendix 2)
- gophish_create_compaigns.py (Appendix 3)
In the process of testing links with parameters, a problem was identified in the interaction between evilginx and gophish. In gophish, the code for adding parameters to URLs is implemented in /models/template_context.go:
phishURL, _ := url.Parse(templateURL)
q := phishURL.Query()
q.Set(RecipientParameter, rid)
phishURL.RawQuery = q.Encode()

trackingURL, _ := url.Parse(templateURL)
trackingURL.Path = path.Join(trackingURL.Path, "/track")
trackingURL.RawQuery = q.Encode()
In the above code, a parameter in a URL string is added without preserving the sequence. As a result, RecipientParameter (`account_id`) can be either the first parameter or the last one. For evilginx, the parameter identifying the user (rid) must be the last in the URL string. For this purpose, it is necessary to modify the gophish code (replace the previous lines with the following ones):
phishURL, _ := url.Parse(templateURL)
q := phishURL.Query()
q.Del(RecipientParameter)
phishURL.RawQuery = q.Encode()
if len(phishURL.RawQuery) > 0 {
	phishURL.RawQuery += "&"
}
phishURL.RawQuery += RecipientParameter + "=" + url.QueryEscape(rid)

trackingURL, _ := url.Parse(templateURL)
trackingURL.Path = path.Join(trackingURL.Path, "/track")
q = url.Values{}
q.Set(RecipientParameter, rid)
trackingURL.RawQuery = q.Encode()
The final algorithm from the moment the list is generated until the target interacts with the phishing page is as follows:
- We configure gophish (email template and SMTP) and evilginx;
- Generate mailing list in CSV format (first_name,last_name,email,position,groups);
- Import it into evilginx and export it to a file. Evilginx encrypts all parameters with RC4 algorithm and creates a link according to the following template: https://{DOMAIN}/{PATH}?{RANDOM}={BASE64(RC4_STRING)}
- Run the gophish_create_groups.py script, as a result of which a unique group will be created in the gophish database for each record in the mailing list;
- Run the gophish_create_compaigns.py script. This script will launch new phishing campaigns for each group by adding a unique target ID to the end of the URL for tracking:
https://{DOMAIN}/{PATH}?{RANDOM}={BASE64(RC4_STRING)}&{rid}={unique_id} - Each email contains a tracking pixel in the format:
https://{DOMAIN}/{PATH}/track?{rid}={unique_id}
and a unique link with parameters for the target:
https://{DOMAIN}/{PATH}?{RANDOM}={BASE64(RC4_STRING)}&{rid}={unique_id} - Opening an email will be captured by evilginx and recorded in the gophish database;
- Clicking on the link will open a page with Cloudflare Turnstile verification;
- After passing the check and clicking the corresponding button, the user will be opened a Google Auth authorization window with JS-code embedding to hide and overwrite some functions, as well as substitute his email address in the login field after decrypting the string from the URL parameter and activating the transition to the password entry stage.
Cloudflare Turnstile
Cloudflare Turnstile is an alternative to the classic CAPTCHA without the need to redirect all traffic through Cloudflare services. Implementing this component before navigating to a phishing page allows you to limit automatic scanners and the work of anti-phishing solutions to prevent bots from recognizing the site as phishing.

This component requires generating tokens in your Cloudflare account and preparing an HTML page with validation. An example HTML page is available in the evilgophish repository: https://github.com/fin3ss3g0d/evilgophish/blob/main/evilginx3/templates/turnstile.html.
Example of the HTML page (sample in Appendix 4):

Starting and configuring the server
Evilginx
Connecting to a phishing server, installing components, and configuring settings:
* Setting up domain A-records is mandatory because, in the next steps, evilginx will try to issue TLS certificates for each domain via the Let's Encrypt service.
I don't want to describe every step of evilginx configuration in detail, especially since they are intuitive and the description of each command can be easily found in the official documentation:
- Config: https://help.evilginx.com/docs/guides/config
- Phishlets: https://help.evilginx.com/docs/guides/phishlets
- Lures: https://help.evilginx.com/docs/guides/lures
GoPhish
Using the GoPhish web interface, configure the administrator password, email template, and SMTP settings for the mailing: https://127.0.0.1:3333/ (look for the administrator password for the first login in the startup log):
- https://127.0.0.1:3333/templates – customize the template in HTML editor mode;
- https://127.0.0.1:3333/sending_profiles – configure the SMTP mailing profile. For testing purposes, we launched the MailHog service (1025 SMTP port and 8025 web interface port) and configured sending via "Host: 127.0.0.1:1025". After launching the test mailing, you will receive emails on the web interface: http://127.0.0.1:8025/.
Copy the "API Key" from this page: https://127.0.0.1:3333/settings. Specify this key, as well as the name of the email template and SMTP settings in the scripts for creating groups and launching mailings.

Launching a phishing campaign
The next step is to generate unique links with parameters in evilginx to create groups and campaigns in gophish. Evilginx supports working with CSV files. Example of a source file with a list of addresses for mailing (test data):
Command to import a file and generate a file with unique links and parameters:
Contents of the urls_0.txt file after executing the previous command:
Make changes before running the next scripts, namely, specify gophish API_KEY, the email template's name, and SMTP distribution.
Start generate groups: python3 gophish_create_groups.py urls_0.txt
Start the phishing: python3 gophish_create_compaigns.py urls_0.txt
Track the progress of the campaign at gophish: https://127.0.0.1:3333/
Receive live event messages: http://127.0.0.1:1337/
Cheatsheet on working with evilginx:
| sessions → list of sessions and status of capturing props: |
|---|
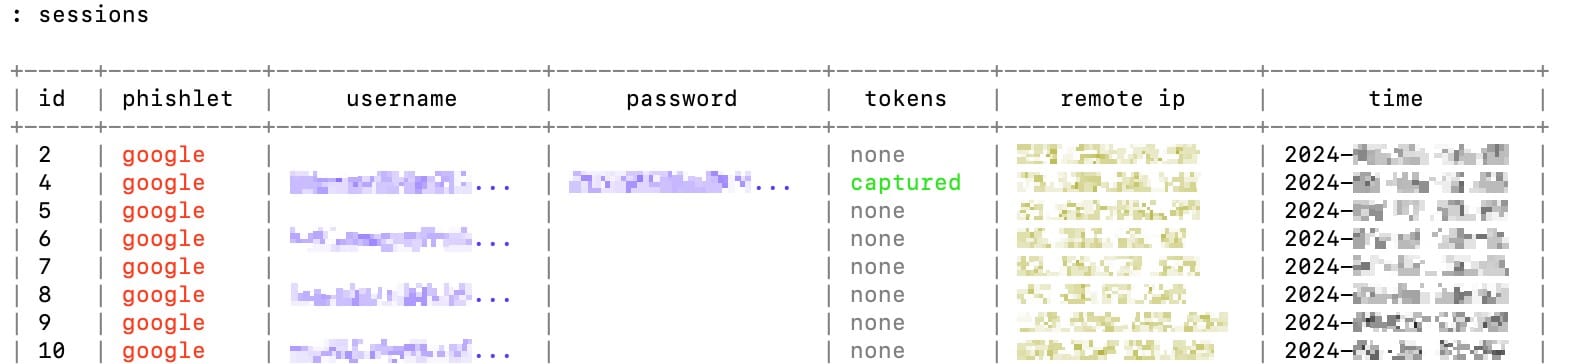 |
| sessions <num> → session details: |
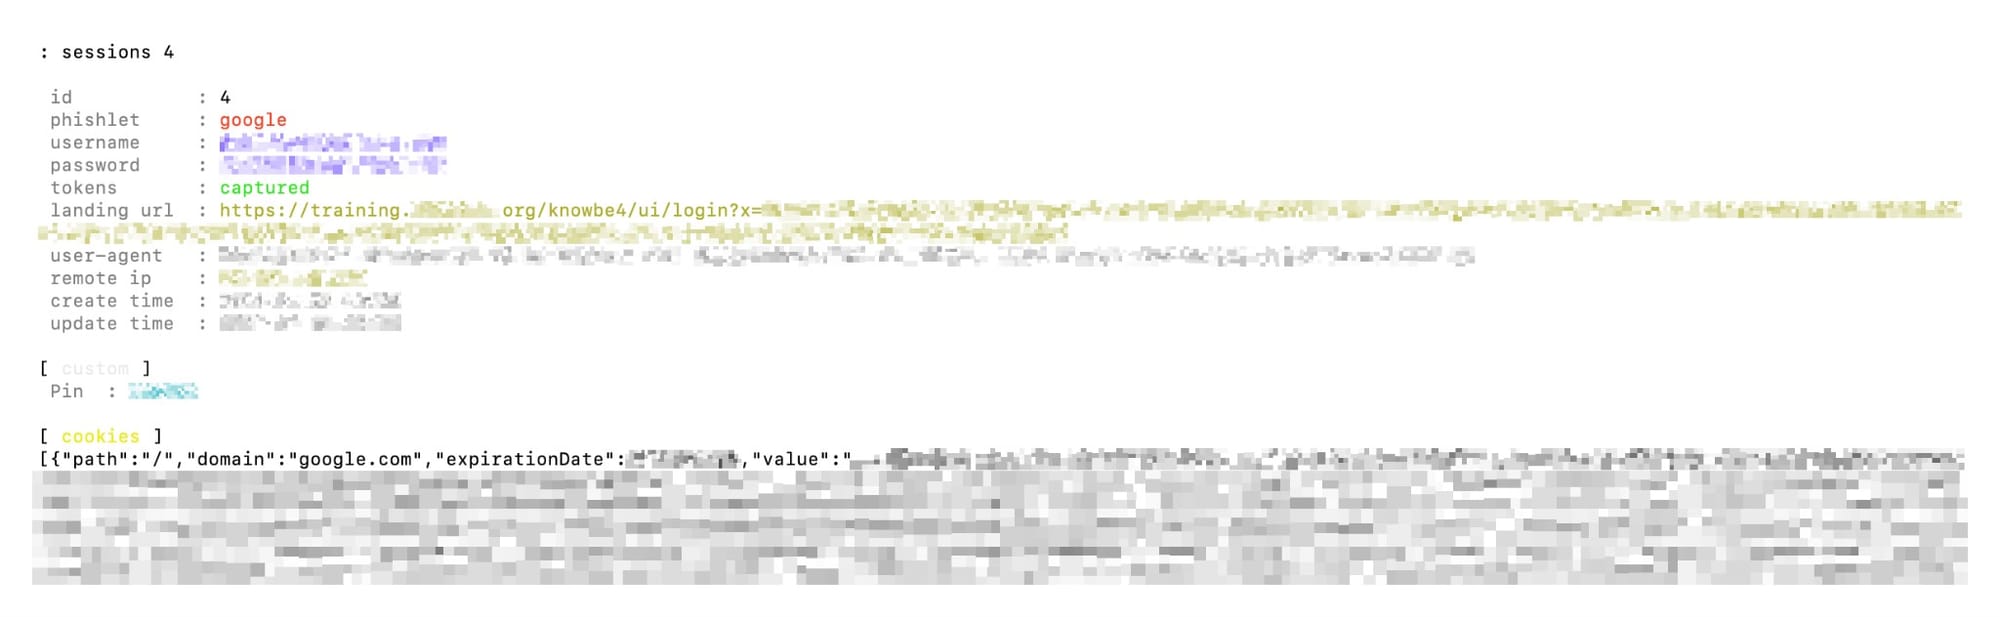 |
If the validity check of the captured details has been agreed with the customer, perform the following steps:
- Your IP address must match the IP address of the phishing server, so configure your browser to work through the SOCKS proxy 127.0.0.1:8090 (the appropriate `-D 8090` option was specified in the server setup instructions);
- Open the authorization page: https://accounts.google.com/
- Copy the cookies from the session and import them into your browser, e.g., via an extension: https://cookie-editor.com/
- Take screenshots to capture successful authorization.
Author: @resource_not_found
Next: Part 3